At the end of my last post, Unfold Your Design Potential - Part 1, I told you where to find the Flatten Surface feature. Now we'll take a look at what happens and what options we have to play with.
Flatten Surface!
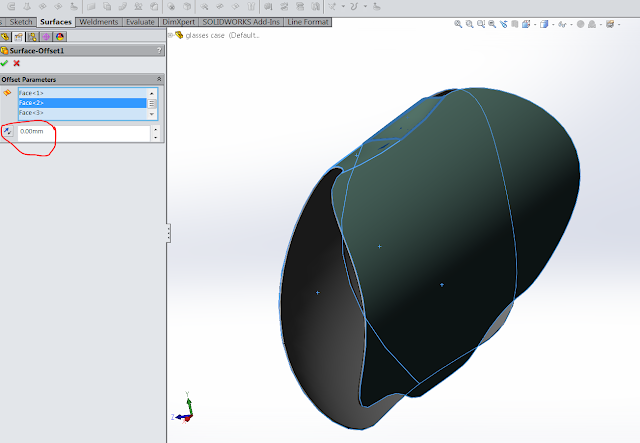
Unless your part has a matching surface, there is one step to do prior to flattening. You need only surface bodies, and one of the quickest ways to get one or more surfaces is to use the Offset Surface command with a zero distance like in the image below. You're essentially creating a copy of the surface and it's what you need to generate the flatten profile.In the part I made, I created a solid after trimming away surfaces - that's my way of determining whether the surface is without gaps. It doesn't guarantee that everything is perfect but you can tell if your surfaces are touching: A solid won't work if there are gaps in the geometry. Then we add the Offset Surface so it can be flattened.
This Flatten Surface tool will allow you to flatten surfaces that are in contact with each other, but you won’t need to "knit" all the surfaces together to use this feature. Multiple surfaces are part and parcel of creating complex shapes and SOLIDWORKS seems to have made it part of the thinking process to get to the end result needed.
A Mesh Quality Preview
Developing the flattened material shape is almost instant depending on your surface and mesh quality settings. The folks at Javelin show you how it works in another scenario in this video.
Determine the Surface Elements
You can review the flattened surface when the command is active to see the mesh quality. It has created a triangular mesh of all of the surfaces and then a as a colleague of mine suggested, an algorithm is applied to flatten out those triangles. The greater the number of triangular elements, the longer the flattened surface will take to generate.
Preview of the mesh and flattened shape
During the flatten process there are also a couple of other options relating to the flattened shape. You can add a control point or edge to determine from where you want the start point of the unfolding or flattening to be. And further control can be added to the flattened shape by selecting edges to be maintained after the surface is flattened. In my case I used a point at the centre of the part and a few edges to control the flattened shape.
 |
| Further options to define my Flattened surface |
So that's the end of Part 2 - In the final segment, part 3, we take a look at how we can manufacture this flattened surface and also touch on some other sources and developments of this feature.


No comments:
Post a Comment
Feel free to comment - you're ideas help me improve and design new content